Thursday, September 17, 2015
Asymmetrical Cut
How To: Asymmetrical Cut with Hotheads Extensions
1. Create section, using the client’s natural part
2. Begin by applying an Original Hotheads Hair Extension, color #2. Next apply a Hotheads Ultimate Hair Extension. This patent pending product mimics natural hair growth. Each individual hair is injected into the tape tab, giving the appearance that it’s growing out of the client’s head.
3. Continue to apply the Hotheads Hair Extensions where length and fullness is required.
4. Once you have apply the desire amount of extensions, you will notice that the weight line has slightly disappeared from the client’s hair. You still may need to back cut to remove weight without cutting into the client’s hair.
5. Take a horizontal section and hold the section with your head. Take the guiding blade, thumb blade is on top, guiding blade is on the bottom and lightly back comb the shears as if you were back combing hair. DO NOT CLOSE THE SHEARS COMPLETELY.
6. Continue back cutting around the top of the head to lightly remove the weight.
7. Back cutting will allow the multiple dimensions to show because we have used 2 different colors for application. This creates a natural look.
8. Begin to smooth the hair with a styling iron to see the shape of the haircut.
9. Remember to keep the angle of the haircut in the front. Depending on how dramatic the haircut is will depend on how steep the angle is.
Music:
Bondax Fader Mix
https://soundcloud.com/fadermedia/bondaxs-fader-mix
Thursday, July 16, 2015
Tousled Beach Waves
1. Section and cleanly apply Hotheads Extensions to give your guest long wavy hair that holds it’s style.
2. Soften the perimeter of the newly applied extensions. Trim or dust the extensions to blend them with your guest’'s natural hair. Cutting the hair at a diagonal while using the guest’s hair as a guide will ensure the most natural blend.
3. After application is complete, use 1” curling rod, wrap hair around rod and hold for 2 seconds. After this pull downward on the curl. Alternate sections by holding the curling rod downward, then upward. Use a thermal-protecting flexible spray like Martino Cartier’s You Had Me at Hello to begin building volume.
4. As you continue around the head, scrunch the curls to give them additional texture. As you arrive at the front, curl away from the face.
5. When the entire head is curled, spray with Martino Cartier’s Shut Up & Kiss Me Texture Spray. This will create gorgeous volume.
6. Finish with a working spray and blow dry the hair slightly. Voila, a natural, tousled and beachy wave, perfect for summer!
Friday, May 22, 2015
Balayage Tutorial
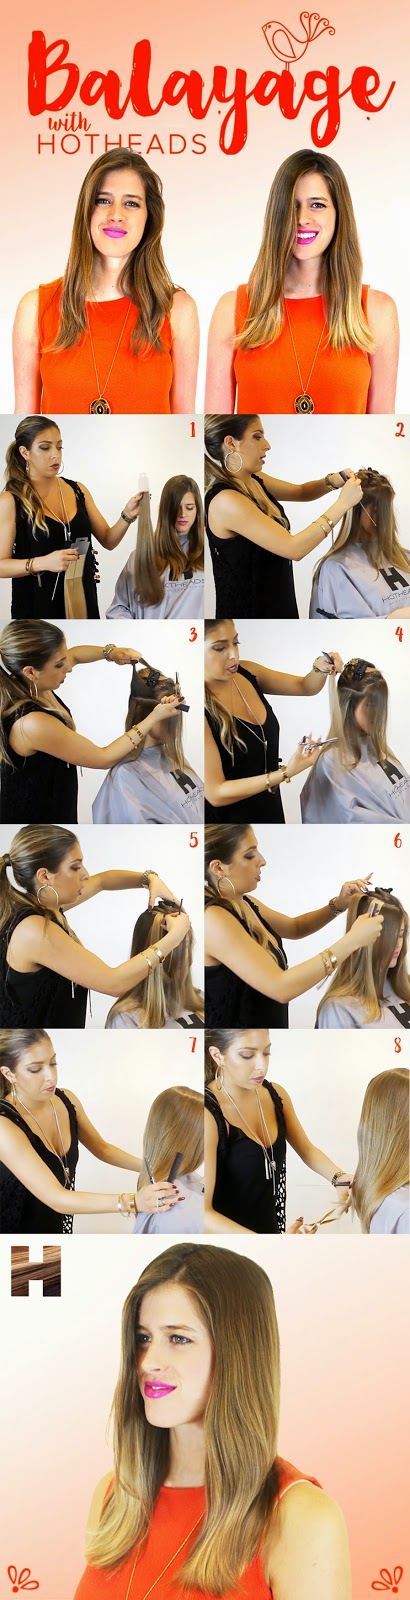
Hotheads Platform Artist Alicia Iannone creates a seamless balayage using extensions. By providing extensions as a method to change hair colors, you are creating solutions for many clients that do not want to color their hair!
1. My guest’s natural color matched Hotheads Color #8 (Dark Blonde) so for this Balayage, I chose #8, #23 (Beige Blonde), #25 (Pale Yellow) & #613 (Platinum) to create a natural, dimensional Balayage.
2. Using the Hotheads Application Method, I added highlights without lifting my model’s hair color.
3. I used #23 on bottom and #8 on top, to achieve a softer look. Working toward the face, use brighter shades to create a bolder look.
4. Using your texturizing shears, thin out #8 (or top color) so that the bottom shade appears brighter. For guests looking for bolder highlights, place a blonde on top of another blonde.
5. As you approach the temple, use #25 on the bottom and #8 on top. #8 matches the model’s base color, allowing #25 to peek through.
6. For dimensional, but bold color effects, alternate the blondes used throughout the application.
7. When application is complete, take a look at the entire head to make sure there are no gaps or separations throughtout.
8. Once the whole head has been applied, dust the ends of the perimeter to flawlessly blend extensions. Hotheads Extensions are pre-layered, so in most cases you will only need to trim the ends.
By providing extensions as a method to change hair colors, you are creating solutions for many clients that do not want to color their hair.
Follow Hotheads Hair Extensions on Instagram, YouTube, Facebook and Twitter for more inspiring tutorials using Hotheads Extensions!
Monday, December 29, 2014
Cast Your Vote Today!
Cast your vote today! Make your voice heard by voting Hotheads Hair Extensions for Best Extensions in Behind the Chair’s Stylist Awards 2015. https://www.surveymonkey.com/s/SPM73TP
3. Prestige Products Company: Hotheads Hair Extensions
4. Product You Can't Live Without: Ultimates by Hotheads
5. Packaging of the Year: Martino by Martino Cartier 6. Education Team of the Year: Hotheads Artistic Team
8. Educator of the Year: Martino Cartier
31. Hair Extensions: Hotheads Hair Extensions
Wednesday, December 24, 2014
Holiday Braided Chignon
Instant length and volume is one of the greatest services you can provide your guests. With the use of Hotheads Extensions, you can create volume in as little as one pack (depending on the density of their hair). Many guests are looking to add length to achieve star quality hair styles, voluminous up-do's and pinterest-worthy braids.
All you need to create this look:
Hotheads Extensions
(1 Pack ) No. 6 in lengths 18” - 20”
(2 packs) No. 8 in lengths 18” - 20”
• Bobby Pins
• Claw Clips
• Sectioning Comb
• Hair Bands or Ties
• Shears
1.Once you apply Hotheads extensions, begin by curling the hair to create extra texture. A deconstructed braid looks effortless and chic! If you are trying to achieve a sleek, finished look, skip the curling iron and opt for a high-quality flat iron.
2. Consider the neckline and jewelry that will be worn, to select the side that the chignon will rest on. Now the hair is ready to be braided. Begin by separating the hair into 2 vertical parts. Pull a thin strand of hair from the outside of the left section. Pull it over to the inside of the right section. if you want a tight braid, take even strands from each side. If you want a more messy look, take uneven strands.
3. Repeat step 2, alternating sides until you reach the end of the braid. Fasten with a hair tie.
4. Once you have achieved your desired braid, start at the top and gently tug pieces of the braid to give it a tousled look. For a sleek finish skip deconstructing the braid. Voila! A perfect daytime look.
5. For a modern chignon, grab the end of the braid and knot it around the top (as you would a bun). Fasten with bobby pins that match your guest’s hair color.
Thursday, November 13, 2014
Sombre Tutorial with Kelly Saks
Hotheads Extensions are well-known for creating length and volume, but one of the greatest services you can provide to your salon guest is chemical-free color. Hotheads Extensions are available in 42 natural shades, including 6 gorgeous Ombré colors!
With options like these, it’s easy to custom create a trendy color melt to match your guest’s changing needs.
Hotheads Stylist Aurezu custom creates a Sombré (or subtle Ombré) for Fashion Blogger client Kelly Saks (@kellysaks) using Colors No. 6, 7 & 8. This blend of toffee, honey & ash blonde is PERFECT for a Fall Ombré.
The Tools:
• Hotheads Extensions:
1 Pack No. 6 in 18”-20”
1 Pack No. 7 in 18”-20”
1 Pack No. 8 in 18”-20”
• Bobby Pins
• Claw Clips
• Comb
• Hair Ties
• Shears
• Styling Rattail Brush
The Application:
Begin the application by following the Hotheads Sectioning Method. We recommend flat ironing your guests hair to create precise sections.
To achieve this Sombré effect, select the lightest color extension you are working with (for our model it was color no. 8). This color should be coupled together for the first row.
Move to the 2nd row. Using the brick-lay method, place the lightest color extension on the bottom, and top it off with the darkest color extension you are working with. For example, we used color 8 on the bottom and 6 on top.
At the third row switch the top color extension to your mid tone, we placed color 7 on top of color 8 to soften the contrast. Continue this color combination until you reach the row above the ears ( this is typically the 4th or 5th row)
For the row above the ears, couple the lightest color together to brighten up the face. We used 8 on top and bottom for this row.
For the final row use your midtone placed on top of the lightest color. We use color 7 on top of color 8. Keep in mind, this is a custom color service for our guest Kelly Saks.
Use this tutorial as a reference, but select colors based upon your clients natural hair and their desired look.
Subscribe to:
Posts (Atom)